RV Leveling... How To Make It Easy!
Proper RV Leveling
Obtaining the correct level position of your Class C motorhome can insure that you will have a better night's rest, an easier time preparing your meals, and it will go a long way to help your various doors open and close properly.

Proper RV leveling may even extend the life of your refrigerator. At least with the use of the following suggestions and leveling procedures, you will not prematurely reduce your refrigerator's lifespan effectiveness.
If you like to camp in California's wonderful state and national parks, you will have to learn how to effectively level your Class C Motorhome. It seems that not all campsites have good level foundations. Essentially, there are two ways to go about this:
- If your rig is able to absorb the added weight, powered RV leveling jacks make sense. These are usually hydraulic jacks.
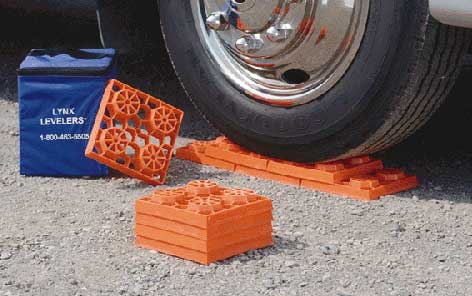
- If weight is more of a concern, you may want to learn how to position your rig on a portable support system like the Lynx Levelers shown below.

Using A Set Lynx Levelers Is Like Putting A Puzzle
Together... But They Work! - If weight is more of a concern, you may want to learn how to position your rig on a portable support system like the Lynx Levelers shown below.
But There Is A Catch
Hydraulic jacks are pretty sweet, they enable a person to level and stabilize their rigs with a touch of a button. These things can be expensive though... and they do weigh enough to potentially cause problems keeping your weight under the GVWR.
Those of us who have automated leveling jacks probably know all we need to get our rig level. It is a simple process of pushing a button at the right time and allowing the automatic system to do its thing.
However, because a lot of us do not have rigs that allow the use of these hydraulic jacks, primarily due to weight restrictions, I’m going to focus this page on the second way of RV leveling... the manual method.
Before You Go Camping
Like everything else out there, the more you do something, the easier it gets. Here are some tricks to help with RV leveling.
It would be a good idea to put a level indicator within view of the drivers seat. The trick is to set up this RV leveling indicator in advance so you will know what your leveling goal is before you start.
You will want to begin this process by parking your rig on a good level surface. It is best to use a good bulls-eye level on the floor or counter top to insure your rig is truly level. I find that just in front of the refrigerator makes sense because this is a major appliance that really likes to be level.
At this stage, it may be a good idea to drive up on an interlocking tire level set like the Lynx Levelers to really get your rig as level as possible. After you are comfortable that your rig is level, attach a bubble or bulls-eye level to your dash or console.
This should be a permanent installation, and it should mirror the results of the earlier bubble measurement made in front of the refrigerator. You will be able to find inexpensive level indicators with some type of adhesive backing at your local camping store.
Sometimes It Is Best To Lower A Tire
In many state parks or forest campgrounds, camp sites are often not very level. You may need some blocks to raise one or more of your wheels by up to several inches.

You May Have To Play With The Dirt
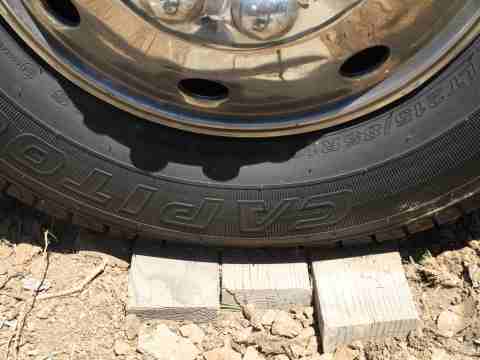
In a pinch, you can use pressure treated wooden planks to help with your RV leveling. The trick is to have a variety of sizes and lengths. The wooden planks, or interlocking leveling blocks, must be large enough that they completely support your tires front to back and side to side.
A Camping Space And Stop
With your new permanent leveler installed, setting up camp becomes much easier. When you have decided on a specific camp site, simply drive slowly onto it while observing your cab mounted RV leveling indicator. You may want to move your rig back and forth, or one way or the other to get the best results.
You will want to get the bubble as close to center as possible. In fact, if you can center your bubble well enough, you may not need to perform additional leveling... you may simply want to use some type of stabilizing jacks to settle things down a bit. This is a personal call.
If it turns out that you need to perform additional RV leveling, you kind of want to think out of the box here. In all likelihood, you will not be able to get totally level without performing some type of external modifications.
Simply get out of your rig and "look things over". It may very well be that all you have to do is scoop out a couple inches of dirt or use your interlocking support system to get things right. You may have to add to one wheel and take dirt away from another. This process will become second nature with time and patience.
When you are satisfied, turn off the rig and set your parking brake. You may want to use wheel chocks to keep everything in place and safe. Oh yeah, if you have an automated system, now is the time to push the button!
Return To Top Of Page
Leave RV Leveling... How To Make It Easy! And Return to RV Tips Page
Leave RV Leveling... How To Make It Easy! And Return To The Class C Motorhome: How To Achieve The Maximum RV Lifestyle! Page
YOUR STORIES
1995 Tioga Montara
Had a Leak - Ouch!
A Simple Way To Put An Electrical Thermostat On A Small Space Heater
In A Truck Camper!
A Great Destinaton, With An Unexpected Outcome!
Test Link
Below: For An Alternative Destination... A Four Mile Hike Around Sugar Pine Reservoir

A Good Place To Begin The Joshua M. Hardt Memorial Trail Is At The Dam. This 3.5 Mile Trail Is Good For Foot Traffic And Bicycles... No Motorized stuff

The Manzanita Day Use Area Is A Good Place To Sit And Watch The Wind
Play With The Water!

Another View From The Joshua M. Hardt Memorial Trail... Morning and Evening Are The Best Times To Hike This Trail. The Still Reflections Will Capture Your Attention

You May Want To Bring A Camera... There Are Large Birds Of Prey High In The Ski


