


RV Rubber Roof Repair Part II:
The Good Reliable EPDM Roof Will
Need Attention Too!
Simple Project... Or A Big Deal
If you own an RV, chances are that you will have an RV roof repair issue of some sort... sooner or later. It may be a simple thing like patching a small puncture

When I bought my Class C Motorhome, I really did not realize that it had some issues. Let's just say that it seemed like a good idea at the time. I want to make the point, however, that since that time, I have completed a lot of research and gathered a lot of information so I now know what many of the pitfalls are when looking for a good, reliable Class C Motorhome.
Having said this, I do not regret buying this particular unit. It has been, and it continues to be, a great learning experience. And, it has been a reliable vehicle. I have had issues with my rubber roof that I want to address here. But first, I think it is important to give a little background.
Before You Buy Your RV
I bought this Class C in July of 2005. We had taken a cruise to Alaska and picked up this vehicle in August when we returned to Sacramento, CA. I remember driving it home. How proud I felt. It ran good, and I was in hog heaven. But, when I got it into my driveway, it started to set in that I did not have a clue about operating or maintaining this Class C Motorhome... let alone being able to do a major RV roof repair.
I did find some operating manuals for most of the accessories like the motor-generator, microwave oven, refrigerator, air conditioner, etc. As I read through this stuff, it slowly sank in that there was more to this than just driving down the road to a park.
I had a huge knowledge vacuum that needed to be filled so I set about to methodically go through and learn what I needed to learn. It wasn't that hard really. Other than having to learn how to flush the toilet and put water in the tanks (I'm not kidding), my major fear was being stranded on the road due to breakdown. So, I had the transmission oil changed, kicked the the tires and generally checked out the running gear.
I also had the motor-generator serviced. I wanted to set a baseline on preventive maintenance. When this was all done, I felt pretty comfortable with the mechanical condition of this motorhome.
I got lucky here. Most of the mechanical verification that was done just after acquiring this Class C Motorhome should have been done before I purchased the thing. However, I wasn't totally blind. I bought this unit on the recommendation of a friend and neighbor that had been RVing for years. He said that this was a "clean little unit". That's all I felt I needed to hear.
This was very much an emotional driven purchase. But, John did me right. It has been a good unit overall. When I add everything up, I have had more Yays than Nays.
After reassuring myself that I could go somewhere and get back home again without undue trauma, I turned my attention to the roof. At the time, I did not know that my roof was an EPDM (Ethylene Propylene Diene Monomer) barrier. I had never heard of EPDM. I couldn't even spell EPDM!
However, having lived in Sacramento, CA, I knew that rain was coming in the following winter season and it was now late August. So, it only made sense for me to check it out and ensure that my roof was in good condition.
but I sure wish I had. The roof was black and pretty much a mess.
I had found information saying that my roof should be cleaned on a regular basis. So, I figured,what the heck... it probably needs a good washing. I had the good sense to go to a local RV Supply Store and ask questions. They pointed me in the right direction, and I bought the recommended cleaner
What a mess! I had just waxed the fiberglass sides
I'll have to say that I was surprised to see that the roof was supposed to be white. I was even more surprised to see wood where EPDM was supposed to be. That was my first clue that an ongoing battle with RV roof repairs was to be in my future.

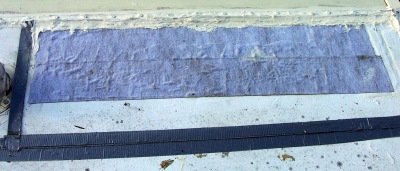
The graphic to the right was taken last June (almost three years later). This was taken just after I had removed the adhesive tape that I had put on three years earlier, and before I removed some damaged EPDM roofing. In January of 2008, I had discovered a leak over my shower, which was just under the ladder brackets where the above photo was taken.
I naturally assumed that my problem was going to be around the area that I had already repaired three years before. I could visualize rotted wood not holding the screws properly. This could have been a can of worms.
Therefore, I felt that I needed to remove my older tape from the previous RV roof repair. I simply had to get a good look at what was going on underneath this rubber roof repair barrier. I was thinking that I was going to have to replace some wood.
However, it turned out not to be a big deal (Whew!). After taking all the adhesive tape off, the wood looked okay. I'll tell ya this, adhesive tape sticks really well. It was three years old and still doing a good job working as a barrier.
Also, the self-leveling sealant around the ladder brackets was doing its job. The screws were rounding out a little bit so I replaced them with fatter screws. I used the same length, but replaced the size 8 screws with a size 10. It also seemed that the apparent wobbly action was also being caused from a "stretching" of the brackets themselves. They are just getting old and tired.

from my EPDM roof.
Unfortunately, EPDM does not like the intense heat. It wanted to bubble as I worked my way through this rubber roof repair project. I'd like to think that I got better at removing the tape, but the truth is, the heat gun and the EPDM did not get along very well. So I did damage some of it.
I ended up just cutting away some of the more damaged areas and decided to use a liquid version of EPDM roofing material as a replacement. This liquid roof product will provide an adequate barrier, but in truth, I probably could have just reapplied new tape. I am comfortable that it would have worked just fine. However, I had already purchased the liquid EPDM rubber roofing repair compound. I will also admit, that I was curious to see if the liquid roofing material could do a proper rubber roof repair.
Mostly, I figured it wouldn't hurt to gain more information... so I ended up applying new adhesive tape
rubber roofing repair barriers.
After removing all the old tape that was around the ladder area, I then built a containment wall with duct tape. I wasn't sure how self-leveling the EPDM liquid would be, and I did not want it to spread all over the roof... I wanted to concentrate it. While it did not hurt to use the duct tape, it probably was not necessary. The liquid stayed localized pretty well.
")
Referring to the graphic on the left, you can see quite a bit of damage to the EPDM.
With the information that I have now, I will tell you, were I to do this rubber roof repair again, I would have cut more of the damaged EPDM roof away. Where the roof is exposed to wood, I would have used WEST SYSTEM's G-Flex 650 epoxy as a foundation. This epoxy would have acted as another water proof barrier.
As it is, referring to the graphic below, you can see the new adhesive tape just before I applied the liquid EPDM. Below that is the graphic showing the process of applying the liquid EPDM with a 4" sponge brush.
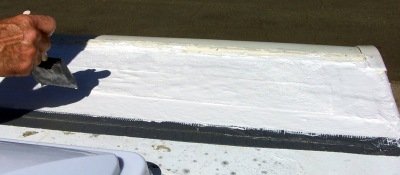
This last graphic below shows the finished product of this rubber roof repair... before I reinstalled the ladder. As it turns out, the leak was located around my
black tank vent opening.
You can see where the tape is covering the old EPDM and wood area. With my previous experience using adhesive tape, I'm thinking that this will wear just fine.
")
Types Of Backing
On this rubber roof repair project, I used adhesive tape with a cloth backing
The challenge I see with this rubber roof repair procedure is the potential for "wear spots". They could occur after the roof has been walked on for a bit. I was hoping that the liquid EPDM would fill the small gaps better. I applied multiple layers of the stuff without achieving a smoother result.
You can purchase an adhesive tape that has an aluminum backing
One last thought... As I've said in my Roof Repair Part I, "Do no harm is rule one."
Well, I think I violated this rule. I spent time and dollars fixing an area that was basically okay. The lesson here is not that I was spinning my wheels. Even if I made a mistake and went too far in the wrong direction when performing this rubber roof repair, it was not catastrophic.
I was better off making a decision and acting on it than finding myself in paralysis. Ultimately, after it was all said and done, this procedure gave me piece of mind. There is a lot of value in that.
ulcer worrying about it.
Return to Top Of Page
Go to Response and Comment Page
Leave Roof Repair II: The Good Reliable Rubber Roof Will Need Attention Too! And Return RV Repair: Sooner Or Later, Something Is Going To Need Fixing! Page
Leave Roof Repair II: The Good Reliable Rubber Roof Will Need Attention Too! And Return To The Class C Motorhome: How To Achieve The Maximum RV Lifestyle! Page

YOUR STORIES
1995 Tioga Montara
Had a Leak - Ouch!
A Simple Way To Put An Electrical Thermostat On A Small Space Heater
In A Truck Camper!
A Great Destinaton, With An Unexpected Outcome!
Test Link
Below: For An Alternative Destination... A Four Mile Hike Around Sugar Pine Reservoir

A Good Place To Begin The Joshua M. Hardt Memorial Trail Is At The Dam. This 3.5 Mile Trail Is Good For Foot Traffic And Bicycles... No Motorized stuff

The Manzanita Day Use Area Is A Good Place To Sit And Watch The Wind
Play With The Water!

Another View From The Joshua M. Hardt Memorial Trail... Morning and Evening Are The Best Times To Hike This Trail. The Still Reflections Will Capture Your Attention

You May Want To Bring A Camera... There Are Large Birds Of Prey High In The Ski