Water Damage Repair Part I:
When Things Get Wet In The
Wrong Places
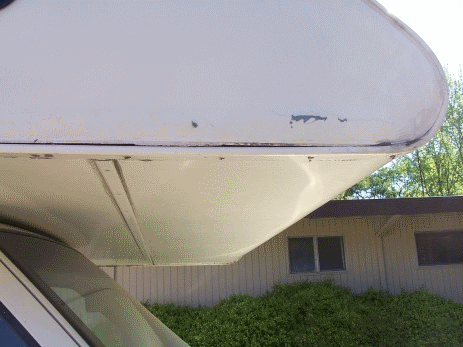
We experienced some water damage to our rig last January while staying at the Sonoma Coast State Beach (Wright's Beach). Standing outside of the vehicle and looking above the passenger side door I noticed a problem with water intrusion on my Class C Tioga. This is not where you want to find yourself having to perform roof leak repairs.
Damage In Your Class C Motorhome

This water leak created a 1/2 inch separation of the fiberglass floor from the side trim piece. This resulted in the floor being pushed down and away, leaving an unsightly gap. We had rain the night before, but just a small amount. Therefore, I'm thinking this was a problem that had been going on for awhile.
The rain became steady, and we decided it was time to head back to Sacramento.
This is a 118-mile drive, so I was hoping that we could duck in between showers.
As a precaution against further water damage from this roof leak, I used a strip of EternaBond tape to make a temporary repair... I sealed it up as best as I could and made a run for it.

Our luck was not good, though. Not only did it rain, it poured all the way home. It also rained most of the next month. I was reduced to putting a tarp on the thing and waiting until the weather improved before I could see the extent of the water damage. Needless to say, I was nervous because I really didn't know just where the leak that caused the water damage was coming from.
Are Present... But Be Careful
I did take my RV down to a local RV service center where they performed an overpressure test on the thing. It was pretty much a useless waste of time because the only information I got back was that it was a "leaker". They wanted something like $3,500.00 to "fix it". I asked for a report showing exactly where it was leaking, but I just received what looked like a parts breakdown on the cost of repair. After it was all said and done, it seemed that their major focus was on selling me a new vehicle. I wasn't impressed.
I am only bringing this up because I feel that a good way to determine where water can penetrate any recreational vehicle is through the process of over pressuring the unit. It is a simple matter of creating 1 or 2 pounds per sq. inches of atmospheric pressure differential inside the unit and then applying soap and water through a sprayer mechanism on the outside seams. In theory, if there is a potential water damaging leak, then air bubbles will form along the fault line. Like I said, it is simple in theory. I have some ideas on how to develop such a water leak detection test.
Having Some Water Damage Issues
As far as my leak was concerned, when the sun finally came out and the rain stopped long enough to begin the repair process, I removed the tarp and looked things over.

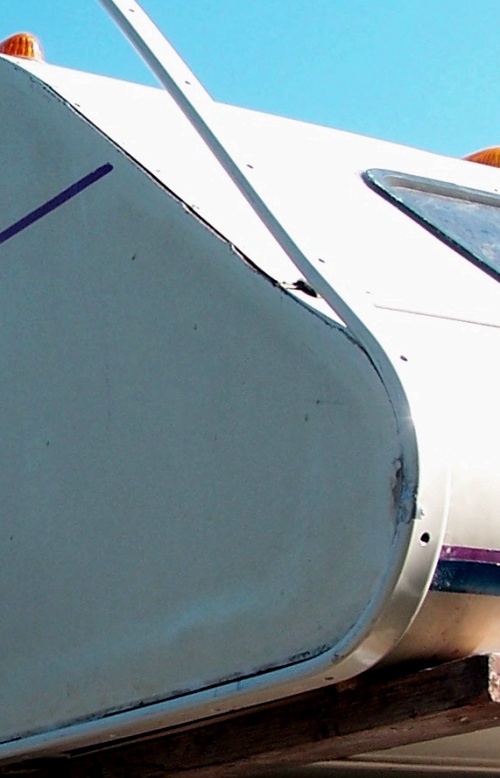
The previous owners appeared to have damaged the front right corner of the cab-over by colliding with something. A repair was attempted to prevent water damage, but the external caulking that had been applied may not have been up to the task of maintaining a water barrier. Upon removing the trim piece, I also discovered more that a few screws had rusted out. It was a mess.
The graphic above shows where the fiberglass was damaged. This appears to have resulted in the swelling caused by water penetration.
Some of the the swelling you see in the graphic above was already on the unit when I bought the thing. At the time I figured that it had leaked; and after the water damage had occurred, it had been repaired. This analysis was based on the fact that there was nothing on the inside showing water damage issues. All my inside panels were, and still are, dry and firm.
One of the key lessons learned about a designed water barrier is that if the motor home is put together properly, there is much less of a chance for it to sustain water damage from a leak.
The bottom line is that the engineering designs on most recreational vehicles are good. However, the manufacturers sometimes drop the ball on assembly.
As an example, when we pulled off the trim piece on the damaged corner, we noticed that when it was assembled, the trim was not configured to sit flush with the radius of the curve. There was about a one-inch gap that prevented a proper seal.
Believe it or not, I read an opinion about this in a magazine on airplanes. The writer made the case that people who assemble and maintain airplanes have a love of their craft while people who assemble motorhomes are semi-skilled employees resulting in a greater potential of reduced standards. I'm not sure that I buy all of his logic, but the industry does, on occasion, have issues with substandard products.
I feel that when purchasing a unit, you want to look at the small things. It is easy to get overwhelmed with the glitz. You want to look to see if the cabinet doors align properly. Are the plumbing fixtures on straight? These are samples of possible manufacturing sloppiness. Look at the screws on the outside trim pieces. Were they "rounded out" during assembly? Did the manufacturer use screws or staples to put the interior together? It doesn't take a rocket scientist to figure out which process will hold up the longest.
Anyway, back to the repair. I'm going to say up front that in almost every situation, two minds are better than one. I probably would not have enjoyed a successful conclusion to this water damage repair project if I did not have the counsel and assistance of my friend, Brian. Brian enjoys a good knack for out of the box thinking and the tools to back up his ideas. He has so many "tool toys", that he puts his garage together like a jig-saw puzzle. Simply amazing. Brian rules the garage, and his wife rules the house. I just do what I'm told... I have a wife, two daughters, two grand daughters, and a female cat. At least I'm well fed!
Due to the rain that delayed the repair on my water damaged class C, we had a lot of time to think about after market repair products. We kind of mapped out what we thought needed to be done. We compiled a list of what tools and supplies we would need to complete the water damage repair.
Brian is a boat owner, therefore, he is always over at West Marine looking at stuff. On one of his trips, he noticed a wide variety of epoxy. After bringing this to my attention, we decided to check it out.
It turns out that West Marine carries a selection of WEST SYSTEM epoxies. We concluded that WEST SYSTEM's G-Flex 650 epoxy would be a suitable epoxy to repair my water damaged Class C. It may even make it structurally better than new! I think this is true in large part due to the waterproofing nature of epoxy when applied to wood.
G-Flex 650 is very new stuff... it was introduced in June, 2007. What makes this epoxy appealing to us was its modulus of elasticity. It has a grip of 150,000 psi (pounds per square inch). WEST SYSTEM's number one selling Epoxy, the 105 series, has a modulus number of 405,000 psi grip.
This relates because G-Flex has nearly the same creep (creep shows how long an epoxy will sustain a load without separation) with much enhanced tensile elongation (five to six times the tensile elongation of WEST SYSTEM 105). Tensile elongation is a simple measuring term determining how much movement can be absorbed before shearing, or breaking apart.
So, how do all of these numbers relate to a repair project on a water damaged motorhome? Well, we needed something that would return the underlying sub frame wood back to its original integrity. G-Flex has the ability to:
- glue water damaged damp woods. It can be used on wet surfaces, even underwater when applied with specific instructions.
- make structural bonds that can absorb the stresses of expansion, contraction, shock, and vibration.
- adhere tenaciously to difficult-to-glue hardwoods.
- bond well to a variety of materials, including dissimilar ones such as metals, plastics, glass, masonry, and fiberglass.
Information Sources For Hardware
Okay! We felt good about the epoxy. However, we still needed some type of insulation tape. I did not want to use plumber's tape because I knew it would become hard and brittle after a period of time. So, I looked online at 3-M.
We got lucky and found another new product recently developed by 3-M. They had just introduced a new weather ribbon seal. The stuff is pretty cool, it will stay pliable over the long haul. This is a quality that will prove to be very effective for our purpose.
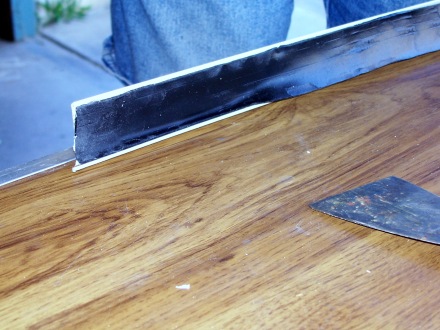
I ended up using a supplier out of Sacramento, CA, called R. S. Hughes Company. I bought a roll of 3-M's weather ribbon seal. It was 1" wide and, as you can see below, matched perfectly with the existing trim piece.

The last piece of the puzzle was finding a substitute for silicone. Although silicone has good sealing qualities, it becomes a real bugger when it is time to replace it. This is because silicone does not stick to itself, so it must be cleaned completely off whatever surface that must be sealed. Chemical removal helps, but it always boils down to a lot of elbow grease.
I used a commercial silicone removal product to get the big pieces off. But, I found a common wet sanding sponge worked best to remove it entirely. I really don't like silicone.
I finished completing the final caulking with a Geocel product call PRO FLEX. Bottom line, it has all the sealing qualities of silicone, but it is capable of being reapplied to itself, or even painted, after it dries.
One hundred stainless screws were used to replace the original factory screws and a 4' X 4' X 3/4" plywood board was used to help brace the repair area when applying epoxy.
Maybe you have also completed a project that came out well. EVERYONE likes to hear success stories! In fact, the feedback that I've received on my project indicates that many of my on-line readers are searching for information about projects to help them modify or repair their rigs.
So, maybe you have a story to tell... it doesn't have to be about a water damage repair. If YOU have done something to your rig… whether it is a repair project, or even some type of modification to improve the usability of your home on wheels, other people will be interested.
Besides, if you want to describe and submit your project using the form below, I will give you YOUR OWN WEB PAGE to display your handiwork on. Be sure to use pictures, too (if you have them). Just tell a story about what is being shown.
Share your Motorhome Ideas, Plans, and Projects with Other Motorhome Enthusiasts!
We would love to hear about your motorhome projects… anything that other motorhome enthusiasts might enjoy or find educational:
* Any projects with unexpected outcomes... stuff that happens when it wasn’t in the plans.
* Unique ideas or accomplishments that were a huge success… or simply something that solved a problem.
* Did something break down on your last trip? You may have some unique advice for a fellow traveler.
* We are all looking for good repair facilities. Have you had good experiences with any repair services?
* Don’t forget the before and after pictures that tell a story!
What Other Visitors Have Said
See what projects other visitors have completed on their Class C Motorhmomes!
Onan AC Generator Wouldn't Start 


My Onan AC generator would not start, and I knew that it was a gasoline problem. I tried starting fluid which caused it to run for a few seconds and tried …
Hello,
I ended up on this web page because I also have a leak on the roof of my truck camper. After developing a roof leak on my camper, I set about …
Leave RV Repair: Part I And Go To Repair Project Part II

Return To Top Of Page
Leave Water Damage Repair: Part I and return To RV Repair: Sooner Or Later, Something Is Going To Need Fixing!
Leave Water Damage Repair: Part I And Return To The Class C Motorhome: How To Achieve The Maximum RV Lifestyle!
Leave Water Damage Repair: Part I And Go To Water Damage Repair Project Part II
YOUR STORIES
1995 Tioga Montara Had a Leak - Ouch!
A Simple Way To Put An Electrical Thermostat On A Small Space Heater In A Truck Camper!
A Great Destination, With An Unexpected Outcome!


